

Private Detective Walkthrough at Funny Game
Welcome to the Royal Detective: Borrowed Life Walkthrough. Can you end these stone-cold conspirators in fourth dimension? Whether you use this certificate as a reference when things get hard or as a road map to get you from beginning to end, we're pretty sure you'll find what you're looking for here. This document contains a complete Royal Detective: Borrowed Life game walkthrough featuring annotated screenshots from bodily gameplay! We promise you find this information useful as you play your style through the game. Use the walkthrough carte below to quickly leap to whatsoever stage of the game you need assist with. Remember to visit the Big Fish Games Forums if y'all find you need more help. Accept fun! This walkthrough was created by Ana Sprague, and is protected under US Copyright laws. Any unauthorized utilize, including re-publication in whole or in part, without permission, is strictly prohibited.
Walkthrough Carte du jour
- Full general Tips
- Chapter 1: Notice Tristan
- Affiliate 2: Tristan's Workshop
- Chapter iii: Salvage Tristan
General Tips
- This is the official guide for Purple Detective: Borrowed Life.
- This guide does not mention each time you take to zoom into a location; the screenshots bear witness each zoom scene.
- Hidden-object puzzles are referred to as HOPs. This guide does not show screenshots of the HOPs, however, it volition mention when a HOP is bachelor and the inventory item collected.
- This guide gives solutions for all puzzles that are not random. Please read the instructions in the game for each puzzle.
Affiliate ane: Find Tristan
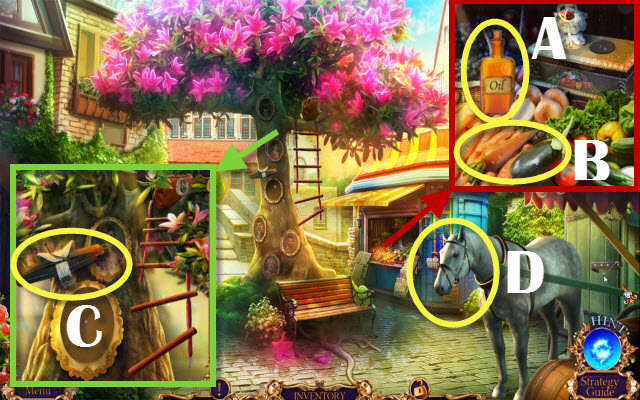
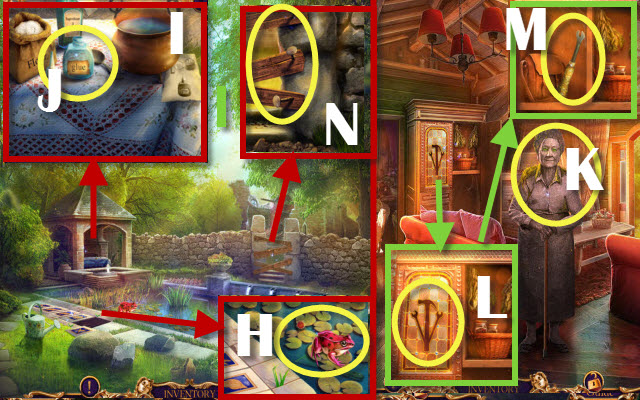
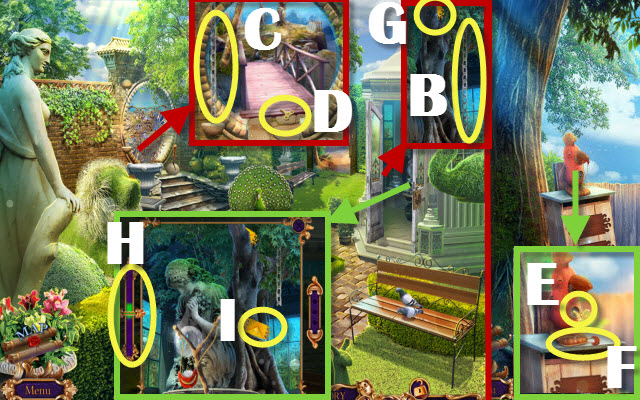
- Receive a DOVE.
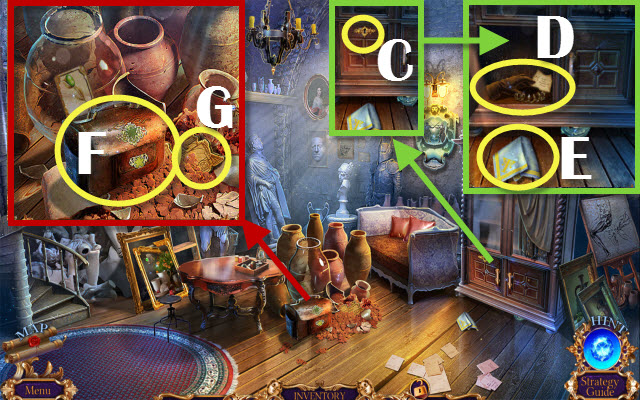
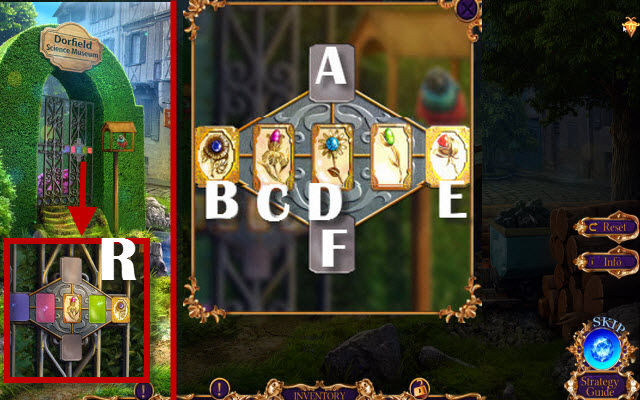
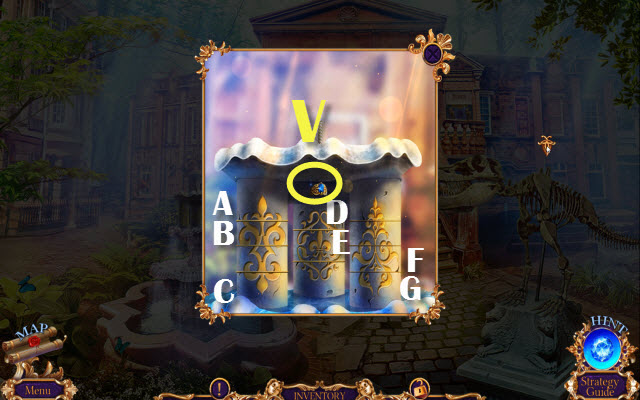
- Take the CLOSED BOTTLE (A), CARROT (B) and BROKEN JACK (C).
- Give the CARROT to the horse (D).
- Take the Metal ROD (E); motion the hat and accept the CORKSCREW (F).
- Combine the CLOSED Canteen with the CORKSCREW; create OIL (Inventory).
- Combine the Cleaved JACK with Metal ROD and OIL; create JACK (Inventory).
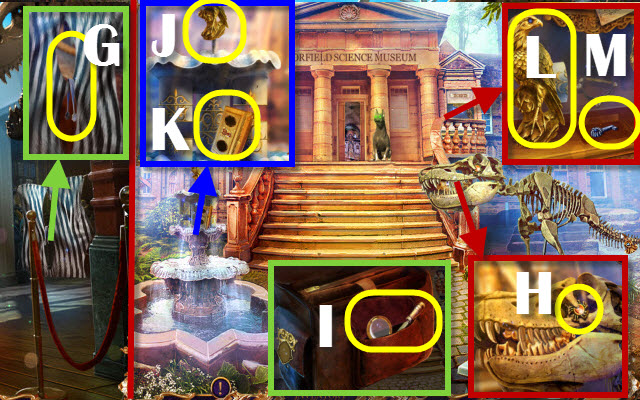
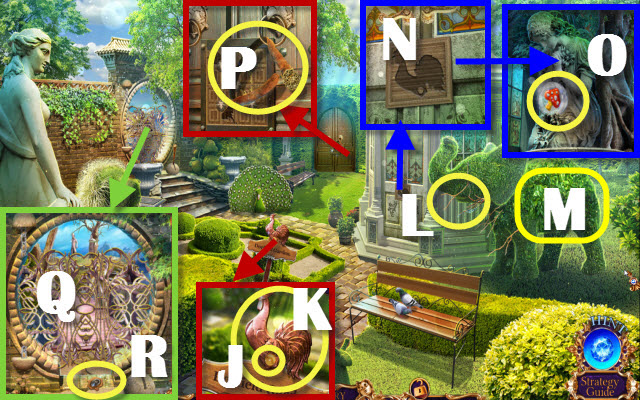
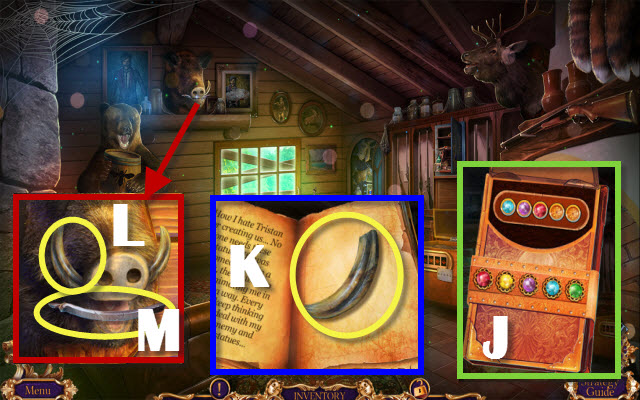
- Have the PORTRAIT Piece (1000).
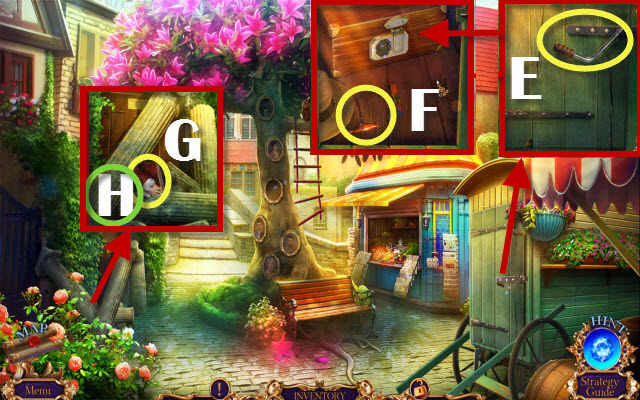
- Use the JACK (H); remove the pillars.
- Enter the Mansion.
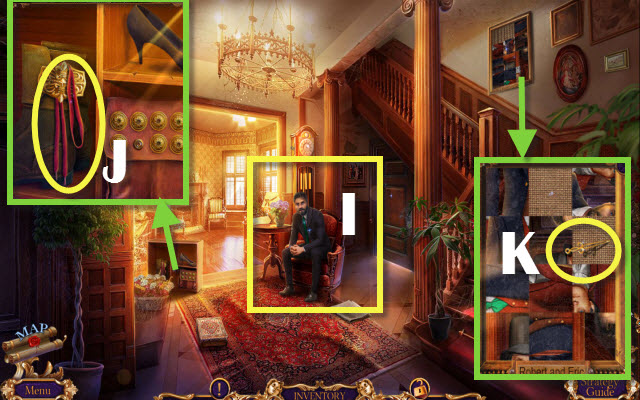
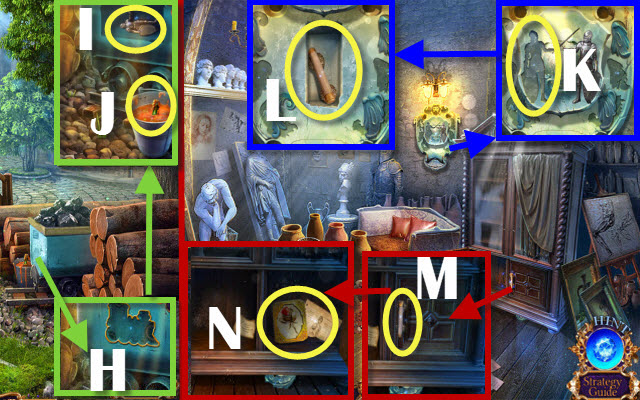
- Speak to Robert (I); receive ERIC'S MEDALLION.
- Take the SHOE LACES (J) and CLOCK Mitt (Yard).
- Walk down.
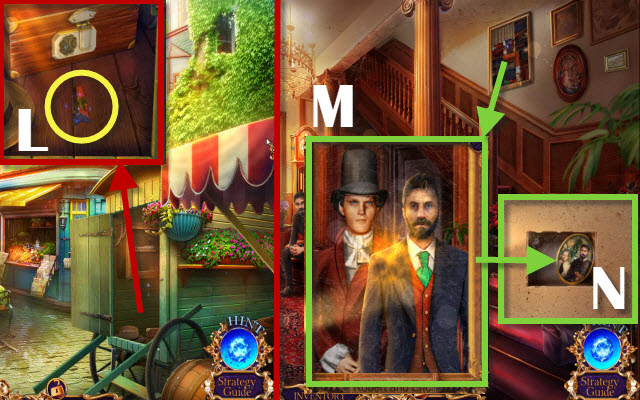
- Use the CLOCK Manus on the 2nd PORTRAIT Piece (L); take information technology.
- Enter the Mansion.
- Identify the two PORTRAIT PIECES; complete the photograph (M).
- Take the PORTRAIT (N).
- Walk downwardly.

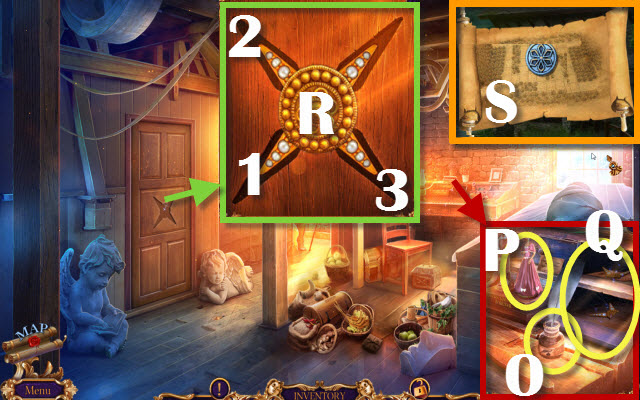
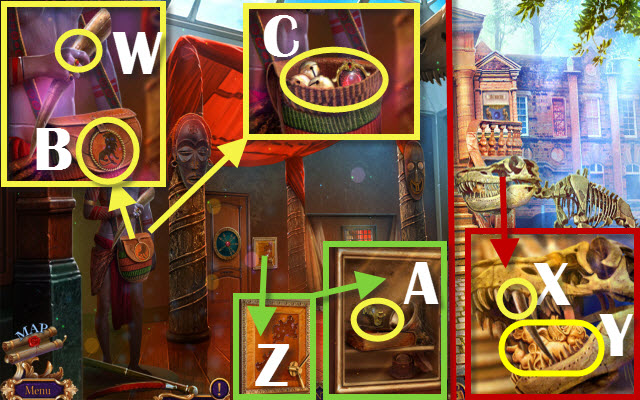
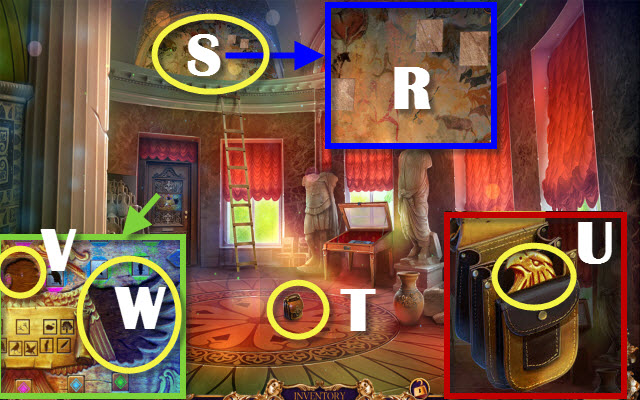
- Use the SHOE LACES (O); take ERIC'S Bag (P).
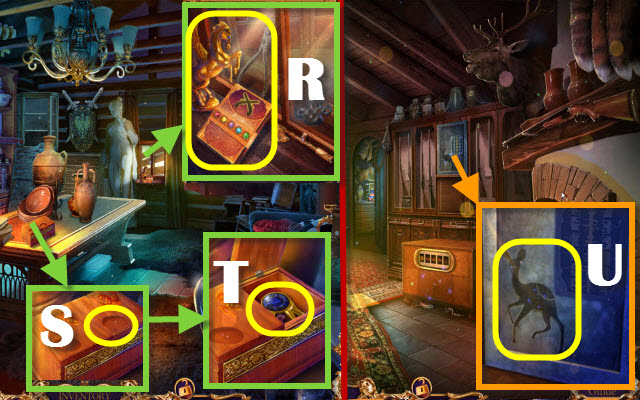
- Place the PORTRAIT and have the MAN FIGURINE (Q); and read the notation.
- Place the Man FIGURINE (R); have the BAG CLASP (S) and read the roll.
- Enter the Mansion.

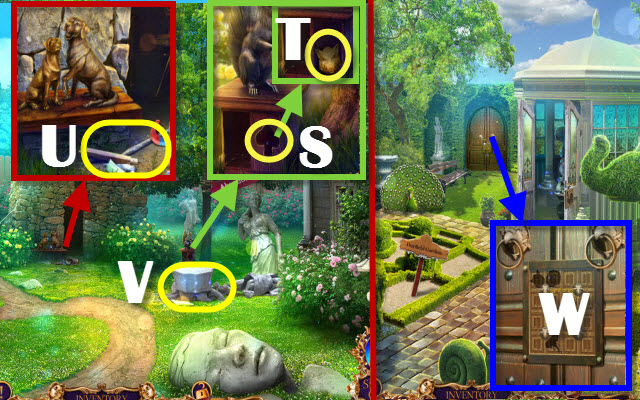
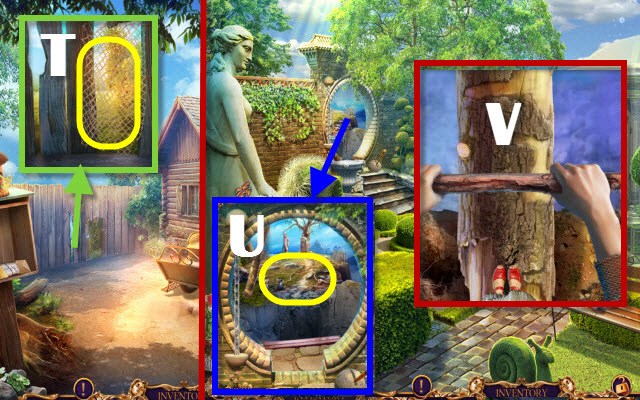
- Place the Handbag Squeeze (T).
- Friction match the colors (U).
- Take the PLIERS (Five).
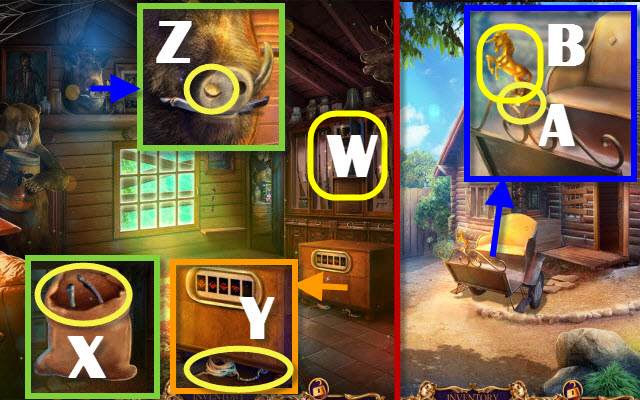
- Use the PLIERS; accept the SPRING (W).
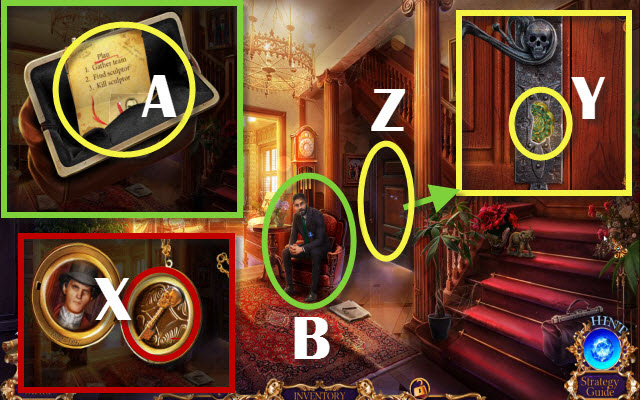
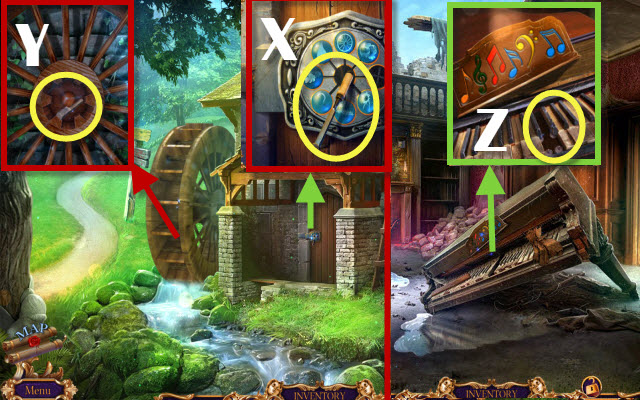
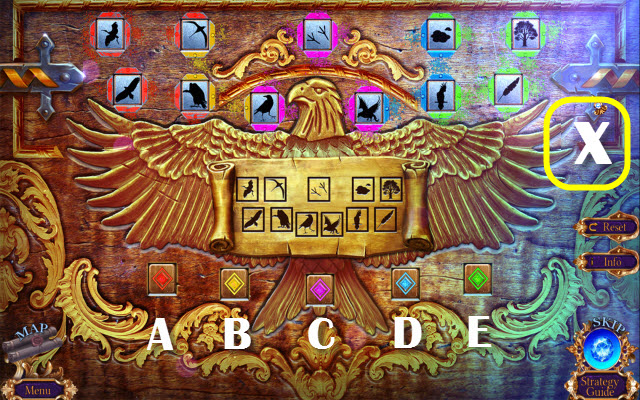
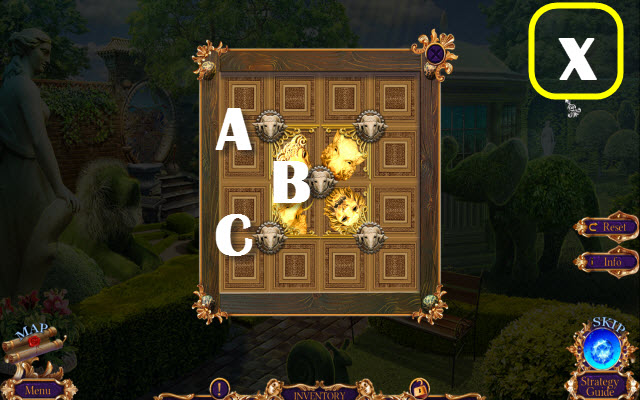
- Open ERIC'S MEDALLION (Inventory); select twice. Place the SPRING, select twice and accept the SKULL Primal (X).
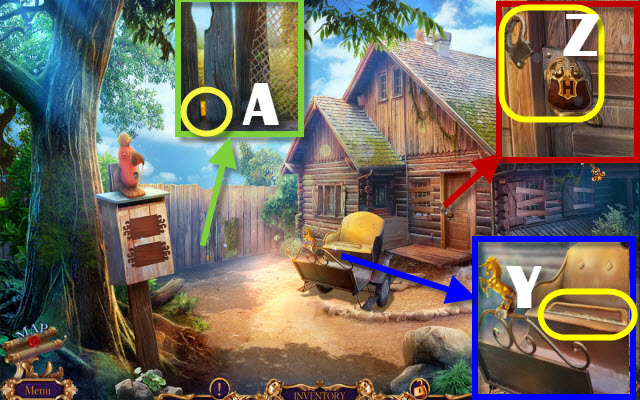
- Utilize the PLIERS to become the IRON BUTTON (Y); insert the SKULL KEY.
- Play the HOP (Z); receive a MONOGRAM E.
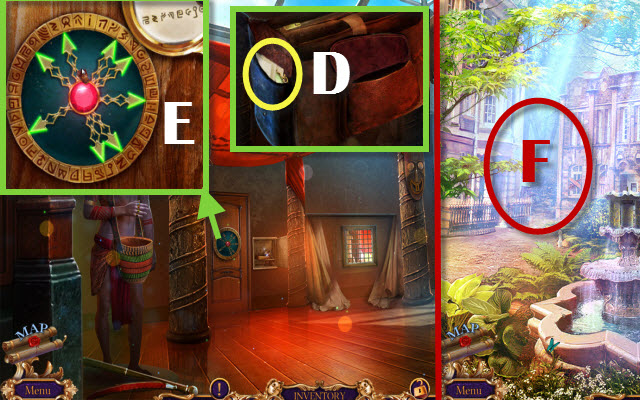
- Combine ERIC'S Handbag and MONOGRAM E (Inventory); take ERIC'S NOTES and CLOCK PIECE 1/3 (A).
- Requite ERIC'South NOTES to Robert (B); receive a STATUE SIGN.
- Walk downwardly.
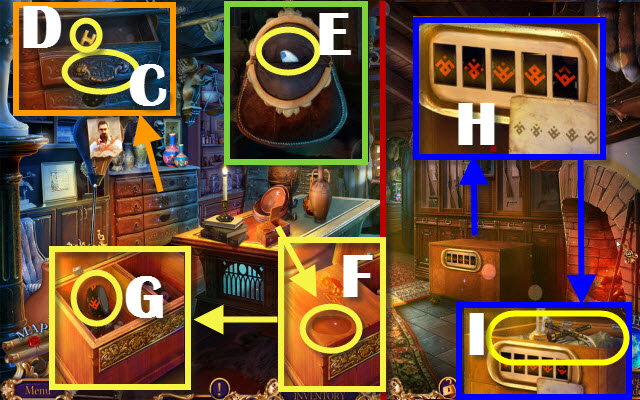
- Place the Iron Push and push button it (C); have the CLOCK PIECE 2/3 (D).
- Utilize the STATUE SIGN (East).
- Walk forward.
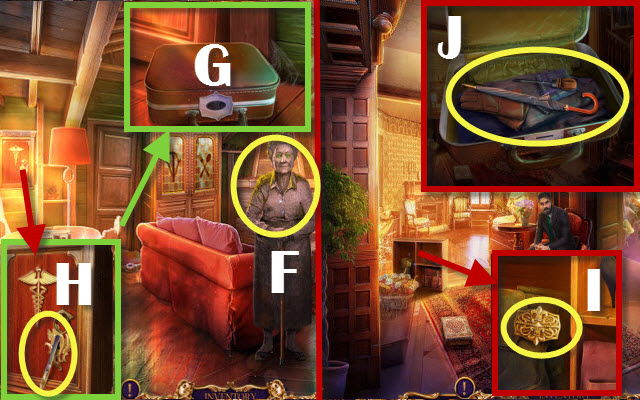
- Speak to Henrietta (F).
- Accept the SUITCASE (G) and SCALPEL (H).
- Go to the Mansion.
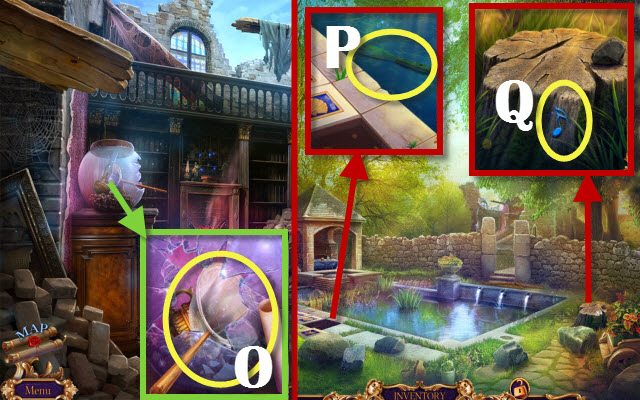
- Employ the SCALPEL to become the CLASP (I).
- Combine the SUITCASE and Clasp (Inventory); read the annotation. Take the UMBRELLA and SCREWDRIVER (J).
- Render to Henrietta's Business firm.
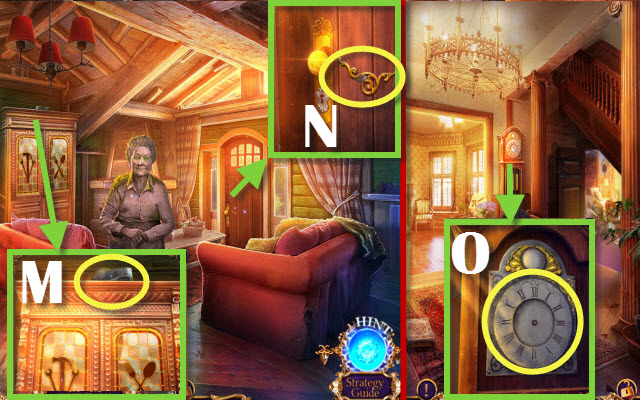
- Use the UMBRELLA to retrieve the WEDGE (G).
- Apply the SCREWDRIVER to get the CLOCK PIECES (N).
- Render to the Mansion.
- Place the CLOCK PIECES (O).
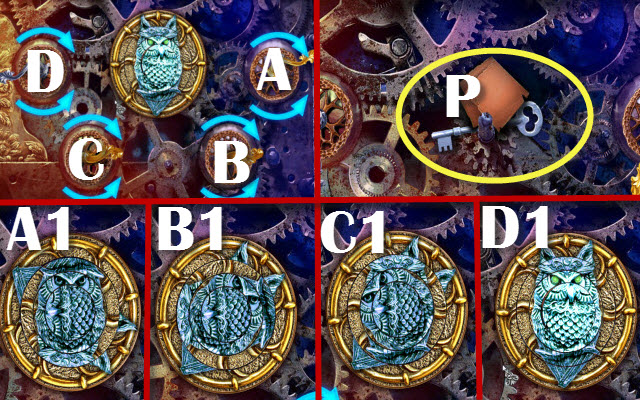
- Select arrows in guild until information technology looks like its corresponding screen: A downwards until A1, B up until B1, C downwardly until C1 and D up until D1.
- Read the note; take the Argent Cardinal (P).
- Go to Henrietta's Firm.
- Insert the Argent KEY; plough it (Q).
- Become to the Park.
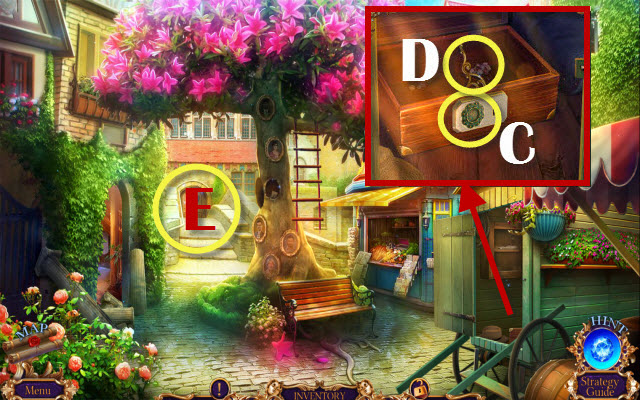
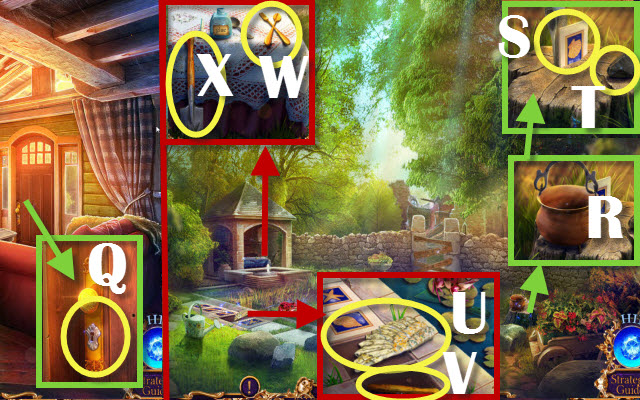
- Take the CAULDRON (R).
- Identify the WEDGE (S); select the stone (T) and take the TILE (S).
- Take the PARROT WING and place the TILE (U); take the SPADE'S SHAFT (V).
- Have the FORK AND SPOON (W).
- Place the SPADE'S SHAFT; have the SPADE (10).
- Take the Cleaved PARROT (Y); utilize the SPADE to become the Kickoff Assist KEY (Z).
- Walk downwards.
- Place the FORK AND SPOON (A); accept the WHEEL, FLOUR and GLUE RECIPE (B).
- Identify the WHEEL (C).
- Play the HOP (D); receive a RAKE.
- Employ the Offset Help KEY (E).
- Solution (F).
- Take the INGREDIENT J (G).
- Return to the Park.
- Utilize the RAKE and CAULDRON on the water (H); receive a CAULDRON WITH H2o.
- Place the GLUE RECIPE, CAULDRON WITH WATER, FLOUR and INGREDIENT J (I).
- Select the flour, cauldron and take the GLUE (J).
- Combine the BROKEN PARROT, GLUE and PARROT Wing; receive HENRIETTA'S PARROT (Inventory).
- Walk down.
- Give HENRIETTA'S PARROT to Henrietta (M); receive WORKER FIGURINE.
- Identify the WORKER FIGURINE (L); accept the NAIL PULLER (M).
- Render to the Park.
- Utilise the Boom PULLER 3x (N).
- Walk forward.
- Have the SCOOP Net (O); read the annotation.
- Walk downward.
- Use the SCOOP NET (P); take the PALETTE KNIFE (P).
- Use the PALETTE KNIFE; take the MUSIC NOTE (Q).
- Walk forrad.
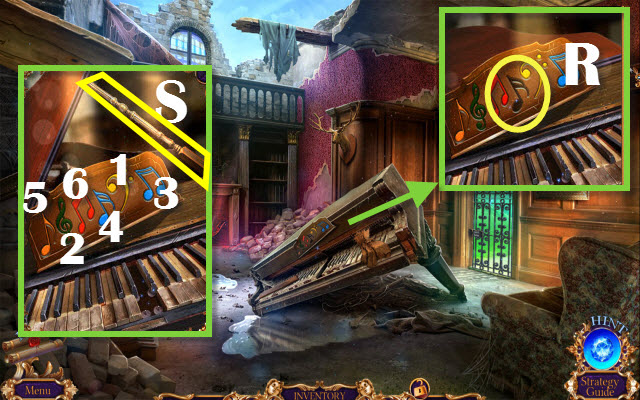
- Identify the MUSIC Notation (R).
- Solution (1-6); take the Chapeau PROP (S).
- Use the LID PROP (T); take the MITTEN.
- Apply the MITTEN to go the LAMP and PIANO Fundamental (U).
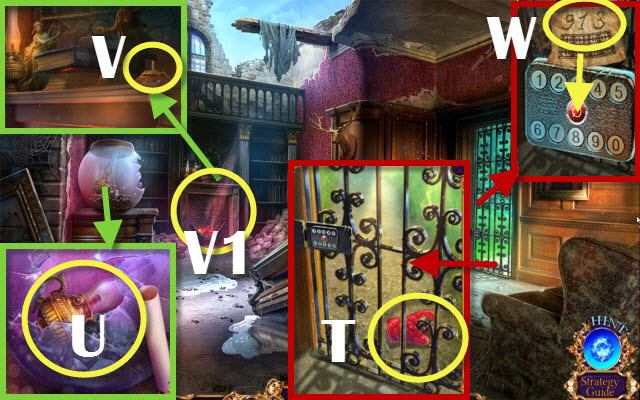
- Place the LAMP (V).
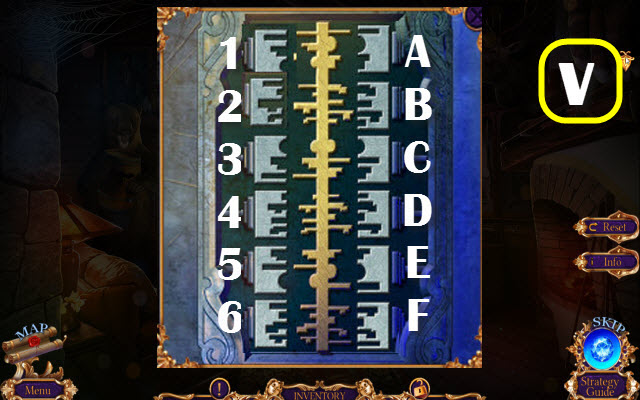
- Play the HOP (V1); receive a CODE.
- Apply the CODE; punch in 913 (W).
- Get to the Watermill.
- Accept the CHISEL (Ten) and second PIANO KEY (Y).
- Walk down.
- Identify the ii Piano KEYS (Z).
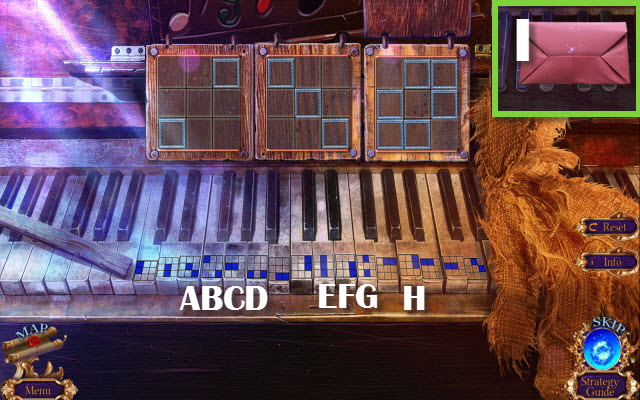
- Solution: D-F-H, B-Eastward-G and H-D-C-One thousand-A.
- Take the FOLDED PAPER (I).
- Go to the Watermill.
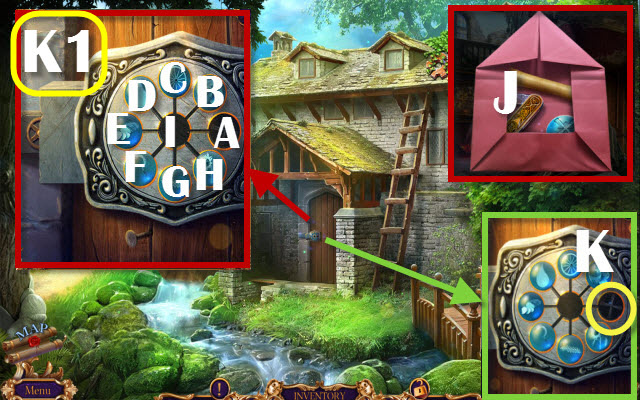
- Open up the FOLDED Newspaper (Inventory); take the STATUE Plan, Blunt Pocketknife and MILL AMULET (J).
- Identify the MILL AMULET (1000).
- Move the following: BIA-GIB-CIG-FIC-HIF-AIH-DIA-EID and AIE (K1).
- Walk forwards.
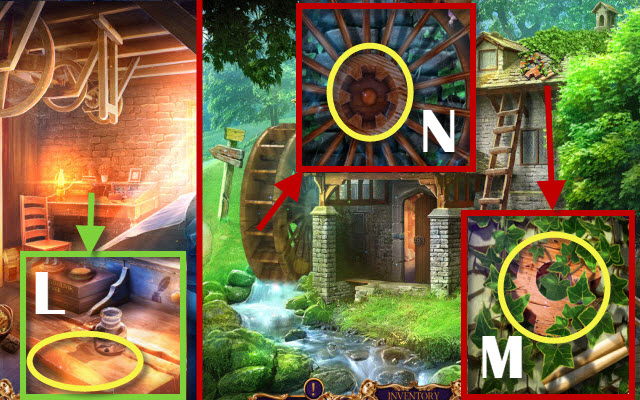
- Use the Blunt KNIFE (L); receive a Knife.
- Walk downwardly.
- Use the Pocketknife to get the MECHANISM Function (Grand); read the annotation.
- Place the MECHANISM PART (N); receive an OLIVIA FIGURINE.
- Walk forward.
- Combine the DOVE and STATUE Plan; receive a FEATHER (Inventory).
- Place the FEATHER (O) and OLIVIA FIGURINE (P); take the ii DOOR PIECES and OLIVIA SKETCH (Q).
- Place the 2 DOOR PIECES (R); select 1-ii and 3.
- Receive a Parcel.
- Open up the PACKAGE (Inventory); go a Central Half and Forest MAP (S).
- Walk downwardly.
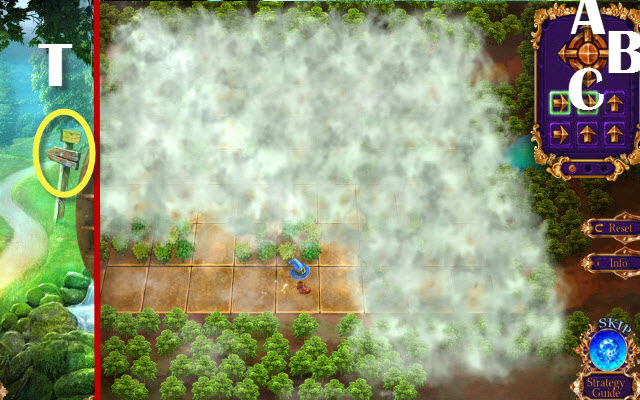
- Use the FOREST MAP (T).
- Select the arrows: A-B-B-C-B-B, B-B-A-B-A-A and B-C-B-B-C-B.
Affiliate 2: Tristan's Workshop
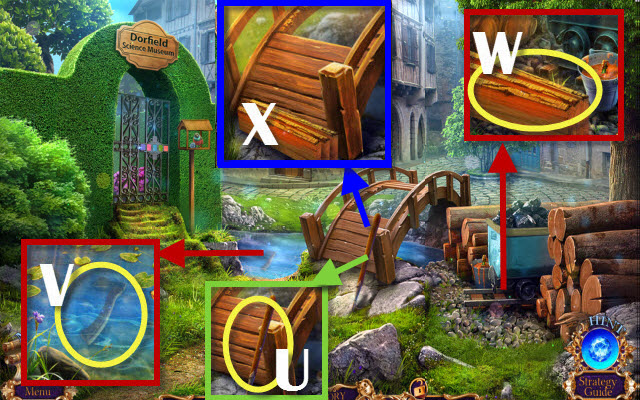
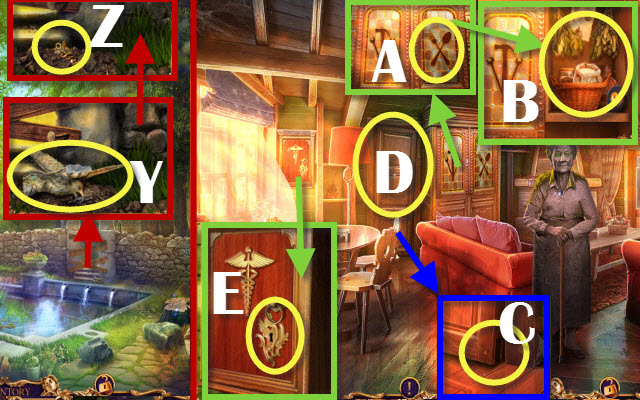
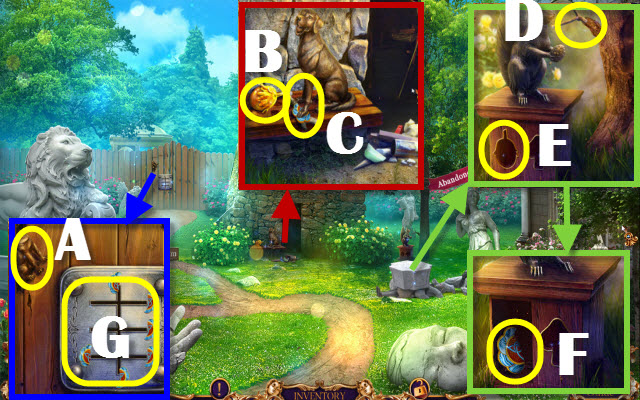
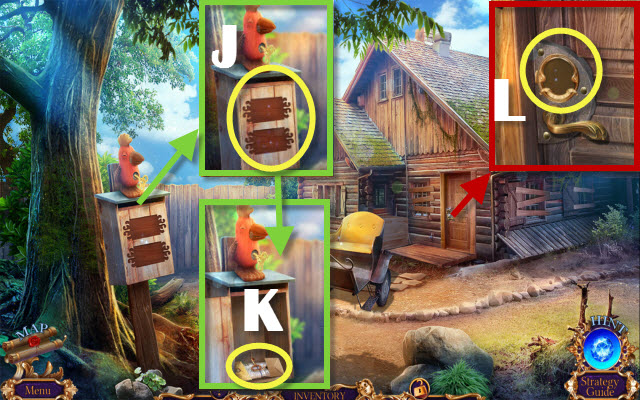
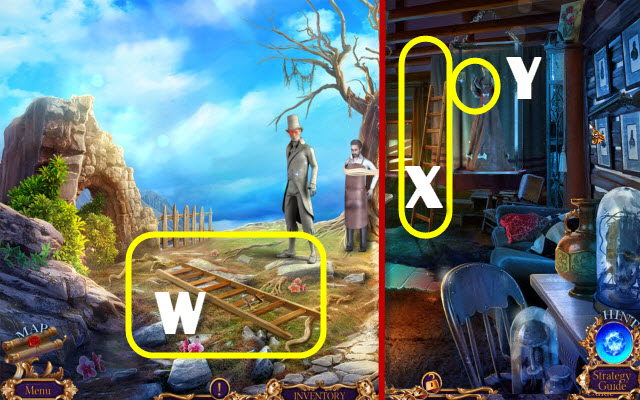
- Accept the BOATHOOK (U).
- Use the BOATHOOK to become the AXE (V).
- Utilise the AXE; take the PLANKS (West).
- Place the planks (X); select them.
- Accept the BAG (Y).
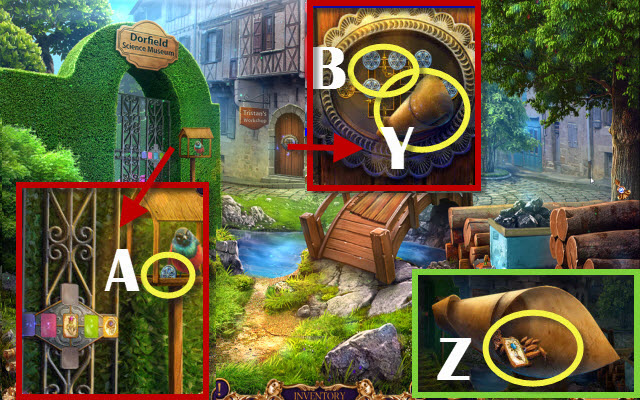
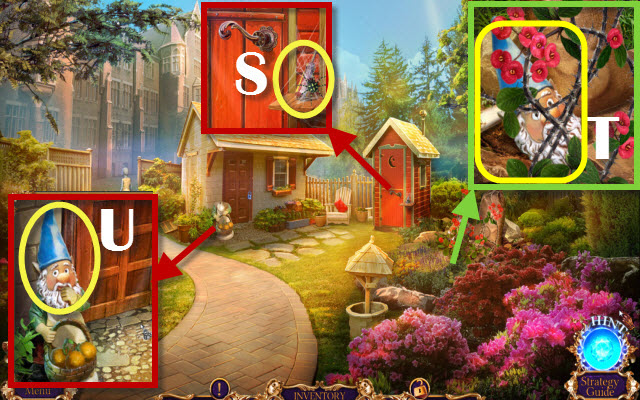
- Open up the BAG (Inventory); take the CAMOMILE, SEEDS and CLASP PIN (Z).
- Requite the SEEDS; take the 2d KEY HALF (A).
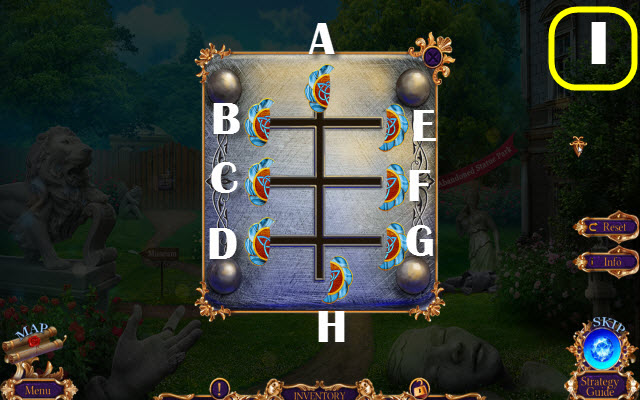
- Identify the 2 KEY HALVES (B).
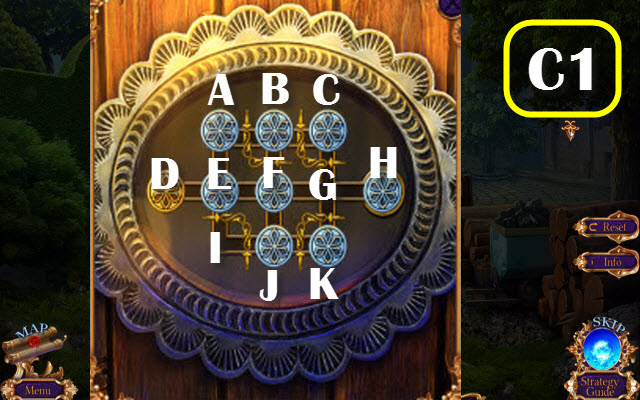
- Solution: F-Thou, Due east-F, J-I, A-Eastward, I-J, East-I, D-Due east-A, F-Due east-D, B-F-E, A-B, E-A, G-F-E, B-F, C-B, H-G-C and F-G-H (C1).
- Enter the Workshop.
- Use the CLASP Pin on the lock (C); accept LEATHER GLOVE, PRUNERS Bound and read the annotation (D).
- Take TRISTAN'South SCARF (E) and TRISTAN'South CASE (F).
- Use the CHISEL; take the LOCOMOTIVE (Grand).
- Walk down.
- Place the LOCOMOTIVE (H); have the KNIGHT FIGURINE (I).
- Use the LEATHER GLOVE to get the Airtight Bottle (J).
- Combine the Closed Canteen, TRISTAN'South SCARF and CORKSCREW; create a Bottle OF ACID (Inventory).
- Walk forward.
- Identify the KNIGHT FIGURINE (K); take the WOODEN HANDLE (L).
- Pull the handle; replace the WOODEN HANDLE (G).
- Have the ROSE and 2nd OLIVIA SKETCH (North).
- Go to Within Watermill.
- Receive a Concatenation.
- Place the 2 OLIVIA SKETCHES (O).
- Play the HOP (P); receive OLIVIA'S STATUE.
- Go to Workshop.
- Use the Chain to retrieve the TULIP (Q); take information technology.
- Walk downwards.
- Place the ROSE, CAMOMILE and TULIP (R).
- Move the following: D-A, C-D, B-F, A-B, B-C, East-A, A-B and F-E.
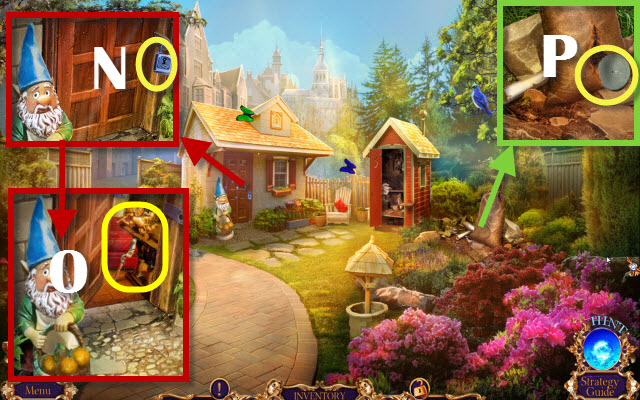
- Enter the Front Garden.
- Employ the LEATHER GLOVE; take the CROSS SCREWDRIVER (S).
- Pour the BOTTLE OF ACID; take the GNOME Caput (T) and read the note.
- Identify the GNOME HEAD (U); receive a Blueprint PART.
- Become to the Workshop.
- Use the CROSS SCREWDRIVER (V); take the FRAME Slice (W).
- Use the FRAME PIECE to become the 2nd PATTERN PART (X).
- Identify the 2 PATTERN PARTS (Y).
- Select the following: E-C, E-A, B-D and F-E.
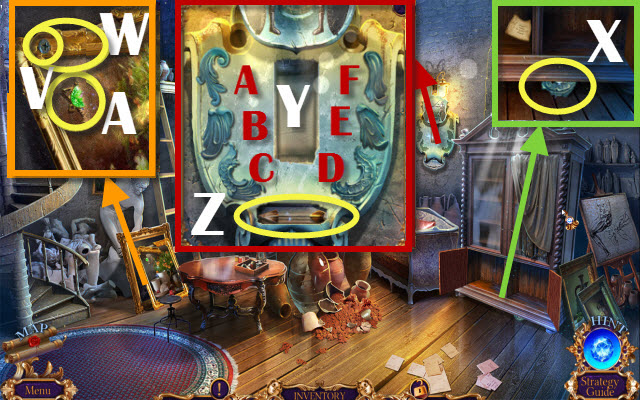
- Take the Pointer (Z).
- Use the Arrow; take the EMERALD CLASP (A).
- Go to the Front Garden.

- Combine TRISTAN'S CASE and EMERALD CLASP (Inventory); have the Cabinet HANDLE and WIRE (B).
- Select the handle and place the CABINET HANDLE (C).
- Take the Broken PRUNERS and BED Encompass (D).
- Use the BED Embrace (Eastward).
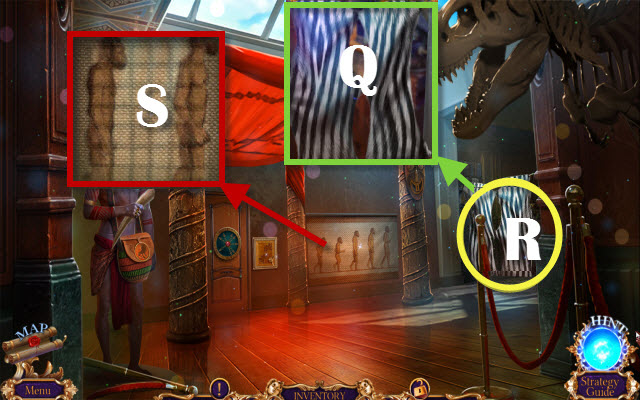
- Go to By the Museum.
- Use OLIVIA'S STATUE (F).
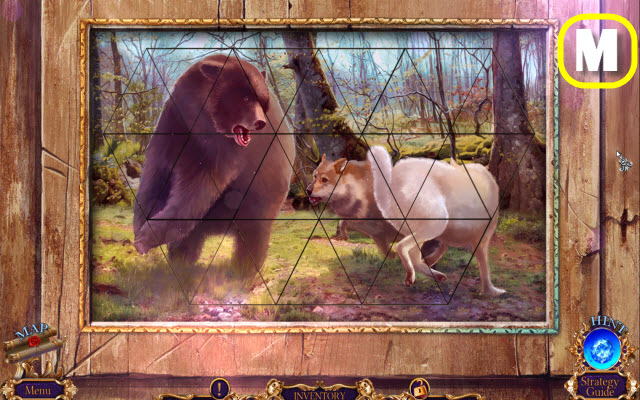
- Move as follows: AB-BC-BD and DE.
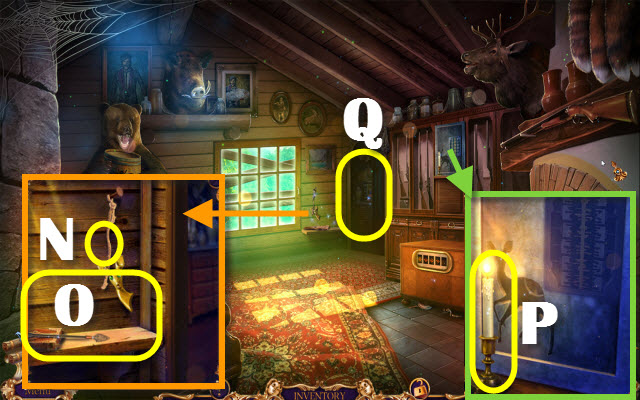
- Walk forrard.
- Have the TONGS (G).
- Walk downward.
- Use the TONGS; receive an EMBER Squeeze (H).
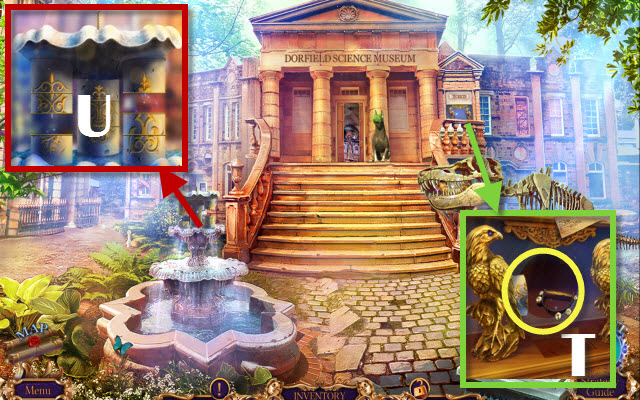
- Combine TRISTAN'Due south CASE with EMBER CLASP (Inventory); take the MAGNIFYING GLASS and FILE (I).
- Use the FILE (J); receive the EAGLE FIGURINE.
- Take TRISTAN'S BOX (G).
- Identify the EAGLE FIGURINE (L); accept the Guard'S Key (K) and read the annotation.
- Walk down.
- Use the Baby-sit'S KEY (North); open the door.
- Take the PRUNERS Function and ANGEL FIGURINE (O).
- Combine Cleaved PRUNERS, PRUNERS Function and PRUNERS Jump; create a PRUNER (Inventory).
- Use the PRUNER; take the DISK (P).
- Get to the Grand Hall.
- Use the PRUNER (Q).
- Play the HOP; receive a Drinking glass CUTTER (R).
- Utilise the PRUNER (Due south).
- Walk down.
- Use the GLASS CUTTER; take the JINGLE-BELLS WITHOUT BELLS and 2nd Deejay (T).
- Place the 2 DISKS (U).
- Solution: C-Bx2-Ax3-Fx2-Gx3-Ex2 and D.
- Take the JEWELED RING (V).
- Walk forward.
- Place the JEWELED Ring (W); receive a BONE.
- Walk downwardly.
- Insert the Bone (X);accept the second ANGEL FIGURINE (Y).
- Go forrad.
- Place the 2 ANGEL FIGURINES (Z); have the BROOCH (A).
- Place the BROOCH (B); take the Crimson CLASP and BELLS (C).
- Combine JINGLE-BELLS WITHOUT BELLS, BELLS and OLIVIA'Due south STATUE; receive OLIVIA'S STATUE WITH JINGLE-BELLS (Inventory).
- Combine TRISTAN'S Example and RUBY Clasp (Inventory). Read the annotation; have the Nix and OLIVIA'S VIGNETTE (D).
- Identify the Cipher and MAGNIFYING GLASS; solution (E).
- Walk downward.
- Employ OLIVIA'Due south STATUE WITH JINGLE-BELLS (F).
- Go to Small Hall.

- Receive a MONOGRAM T.
- Use the TONGS to receive a Nib (G).
- Take the Bract (H).
- Place the Neb (I); take the SHOP WINDOW CLASP and STAINED Drinking glass Piece 1/3 (J).
- Insert the Store WINDOW Squeeze (K); take TRISTAN'S VIGNETTE (L).
- Combine TRISTAN'S BOX, OLIVIA'S VIGNETTE, TRISTAN'Due south VIGNETTE and MONOGRAM T (Inventory); take the STAINED GLASS PIECE 2/3 and OWL EYE (Thou).
- Place the OWL Center (N); have the BEETLE (O).
- Place the Beetle (P).
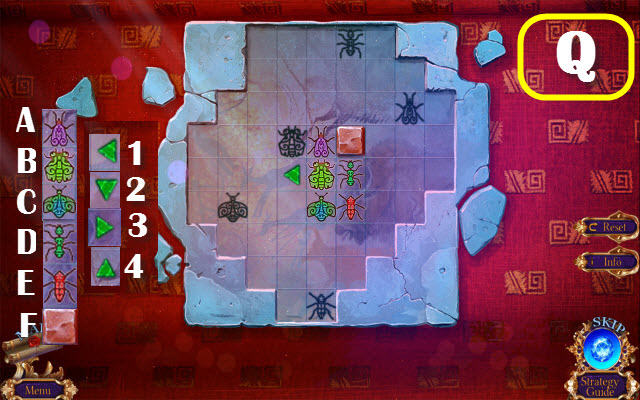
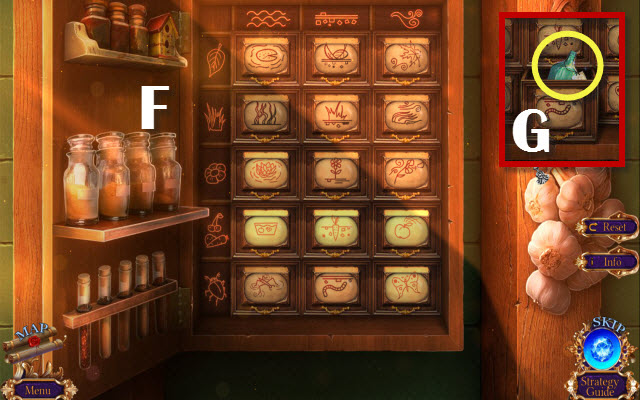
- Solution: B1-B2-C1-E1-E2-D2-E3-E2-B4-B3.
- F3-A3-D4-F2-F1-F4-F3-F2-F3-F4-F3 and A4 (Q).
- Receive a STAINED GLASS WINDOW.
- Place the STAINED GLASS WINDOW (R).
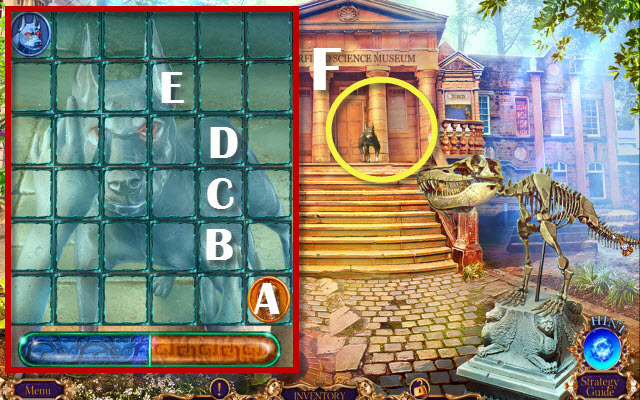
- Play the HOP (S); receive BIRD WINGS.
- Take the KNAPSACK (T).
- Combine the KNAPSACK and WIRE (Inventory); take the BIRD HEAD (U).
- Place the BIRD HEAD (5) and BIRD WINGS (W).
- Select the following: Ax3-D-C-B-A-Dx2-C-B-D-C-Dx2-Cx2-E-D-Ex2 and Dx2 (X).
- Become through the door.
Affiliate 3: Save Tristan
- Receive a CODE.
- Use the TONGS; receive a Domestic dog FIGURINE (A).
- Accept the NUT and identify the Domestic dog FIGURINE (B); have the GOLDEN Money and WRENCH (C).
- Utilise the Blade; receive a SLINGSHOT WITHOUT BAND (D).
- Identify the NUT (E); take the 2nd GOLDEN COIN (F).
- Place the 2 Gilt COINS (G).
- Matching halves: AE-BG-CH and DF (I).
- Walk forwards.
- Use the WRENCH (J); accept the ROOSTER (K).
- Use the TONGS; receive BRANCHES (Fifty).
- Play the HOP (Thou); receive MASKS 1/three.
- Place the ROOSTER (N).
- Use the WRENCH; take the MUSHROOM (O).
- Take the BELT (P).
- Select the gates (Q); take the GORDON'S VIGNETTE (R).
- Walk down.
- Place the MUSHROOM (S); accept the MASKS 2/3 (T).
- Combine the BRANCHES with Belt; create a DUSTER Castor (Inventory).
- Use the Duster BRUSH; accept the TIRE LEVER and MAGNET (U).
- Utilise the TIRE LEVER (V); receive MASKS.
- Walk forward.
- Place the MASKS (Due west).
- Select the post-obit: A-B-A-B and Cx3 (X).
- Walk forward.
- Have the BROKEN HACKSAW (Y).
- Take the HACKSAW PART and WALLET (Z).
- Combine the BROKEN HACKSAW and HACKSAW Part; create a HACKSAW (Inventory).
- Utilise the MAGNET (A); take the AMULET ENVELOPE.
- Walk down.
- Employ the HACKSAW; accept the CHAIN (B).
- Adhere the CHAIN (C); take the WINDING KEY (D).
- Go to the Private Sector.
- Use the WINDING KEY (E); take the BAND (F).
- Combine the SLINGSHOT WITHOUT Ring and Ring; create a SLINGSHOT (Inventory).
- Walk down.
- Use the SLINGSHOT (G).
- Shoot 3x when green (H); take the 2nd AMULET ENVELOPE (I).
- Get forward.
- Place the 2 AMULET ENVELOPES (J); move the envelopes and take the HUNTER'Southward KEY (K).
- Apply GORDON'Southward VIGNETTE and HUNTER'South Key (Fifty).
- Solution (M).
- Walk forward.
- Utilise the BLADE (N); have the Broken CROSSBOW and DEER Half (O).
- Accept the CANDLE (P).
- Use the CANDLE; enter (Q).
- Take GORDON'S NOTES and PEGASUS FIGURINE (R).
- Place the PEGASUS FIGURINE (S); have the 2nd DEER HALF (T).
- Walk down.
- Place the 2 DEER HALVES (U).
- Solution: BC-CD-DE-EF-B2-23-34-45-56.
- B2-23-34-45-4D-C3-34-12-23-AB-2B and 12 (V).
- Play the HOP (W); receive a SACK.
- Examine the SACK and untie it (Inventory); have the CROSSBOW PART 1/3 and AWL (10).
- Apply the AWL; take the ROPE and Chest OF DRAWERS HANDLE (Y).
- Use the AWL; have the Coin (Z).
- Walk down.
- Use the COIN (A); take the UNICORN FIGURINE (B).
- Go to the Collection Room.
- Place the Chest OF DRAWERS HANDLE (C); take the MONOGRAM (D).
- Combine the WALLET and MONOGRAM (Inventory); examine the photo and take the DIAMOND (Due east).
- Place the UNICORN FIGURINE (F); take the Drum Wheel (One thousand).
- Walk downwardly.
- Place the DRUM Bicycle and Code; set the code (H). Take the 2 GUNS and VINEGAR (I).
- Combine GORDON'S NOTES, DIAMOND and TWO GUNS (Inventory).
- Lodge is random (J); take the BOAR FANG (K).
- Use the BOAR FANG (50); have the CROSSBOW PART ii/3 (K).
- Walk forward.

- Pour the VINEGAR (Northward); have the AMULET INFINITY and NIPPERS (O).
- Identify the AMULET INFINITY (P); have the BEE and BRONZE Key (Q).
- Walk downwards.
- Place the BEE (R).
- Play the HOP (S) and receive a HOOK.
- Walk down.
- Combine the ROPE and HOOK; create a Hook WITH ROPE (Inventory).
- Use the NIPPERS; receive a Internet (T).
- Walk down.
- Use the Hook WITH ROPE (U).
- Walk the log (V).
- Take the WOODEN LADDER and CROSSBOW Function (W).
- Go to the Collection Room.
- Identify the WOODEN LADDER (X) and the BRONZE Key (Y).
- Receive an AMULET DROPLET and OLIVIA'S STATUE.

- Place the AMULET DROPLET (Z); accept the BOWSTRING (A).
- Combine the BROKEN CROSSBOW, CROSSBOW PART, BOWSTRING and Internet to create a CROSSBOW WITH Internet (Inventory).
- Go to the Precipice.
- Apply the CROSSBOW WITH Internet and OLIVIA'S STATUE (B).
- Play the Lucifer iii game (C).
- Utilize the Bract (D).
Created at: 2017-03-xix
Source: https://www.bigfishgames.com/blog/walkthroughs/royal-detective-borrowed-life.html
0 Response to "Private Detective Walkthrough at Funny Game"
Post a Comment